
The Viewer App is a standalone React application that WP Debug Toolkit (WPDT) deploys to your website’s root. It reads error logs and query data directly from the filesystem without loading WordPress, querying your database, or calling any WordPress functions. To set it up, navigate to WP Debug Toolkit › Overview, click Install Viewer, set a password, and choose a URL slug. Once installed, the Viewer App remains accessible even when WordPress is fully down.
The Viewer App is a React application that WP Debug Toolkit deploys to your web root during setup. It reads debug.log and query log files directly from the filesystem without querying your WordPress database, loading wp-load.php, or calling any WordPress functions.
The result is a visually engaging browser-based interface for reading error logs and query data that operates completely outside the WordPress lifecycle.
That independence is what makes the Viewer App the most important part of the WPDT setup process. Standard WordPress admin tools cannot render when WordPress hits a fatal error. The Viewer App can.
Because it runs its own PHP API, its own authentication system, and its own rate limiter, none of which touch WordPress, you can diagnose the crash that brought your site down from the same browser you would normally use to log into wp-admin.
The WPDT setup wizard copies a set of standalone PHP and React files to a directory in your website’s root, and none of those files depend on WordPress. They communicate with each other, read log files from disk, and handle authentication entirely on their own. These files include:
api.php handles all data requests from the viewer interface. It reads log files directly from the filesystem and manages viewer settings without involving WordPress or your database.auth.php stores a hashed password that protects access to the viewer. This password is separate from your WordPress credentials, so an attacker who gains access to your WordPress database cannot use it to log into the viewer.rate-limiter.php enforces brute-force login protection using a local SQLite file, independently of WordPress and your database.This guide assumes WP Debug Toolkit is installed and activated in WordPress. If you have not completed that step yet, start with Installing WP Debug Toolkit and License Modules and Tiers before continuing here.
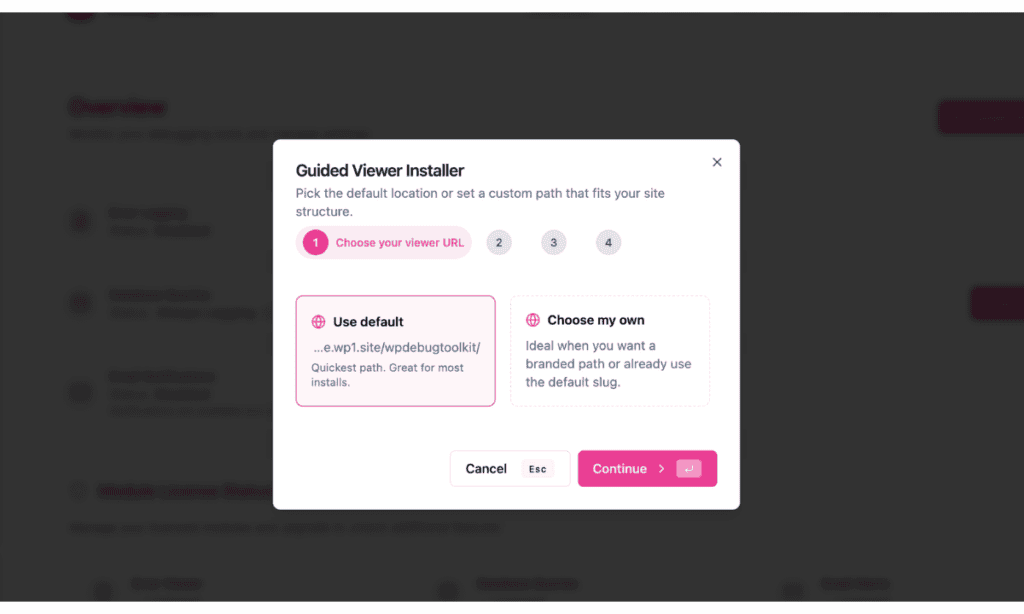
To open the Guided Viewer Installer, navigate to WP Debug Toolkit › Overview and click Install Viewer, or press I on your keyboard.

Pick where the Viewer App lives on your domain:
The slug you choose here becomes the viewer’s permanent URL. You can update it later in the plugin’s admin UI if needed.
Click Continue.
Select the viewers you want to enable. Both are enabled by default:
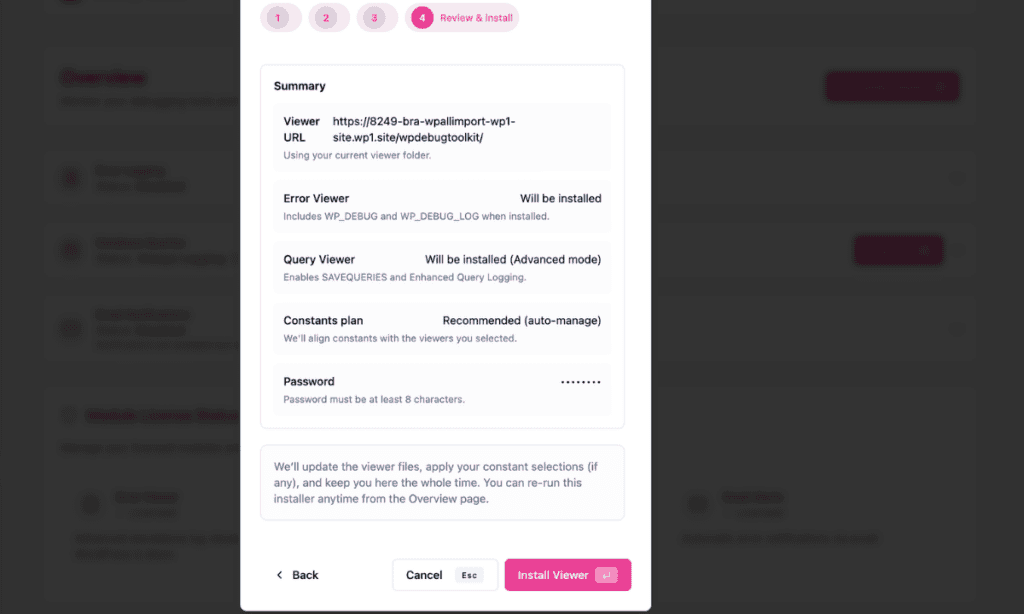
WP_DEBUG and WP_DEBUG_LOG automatically.SAVEQUERIES and enhanced query logging.This screen also shows a Handling your WP constants section. Keep the recommended automation on unless you want to manually manage your debug constants.
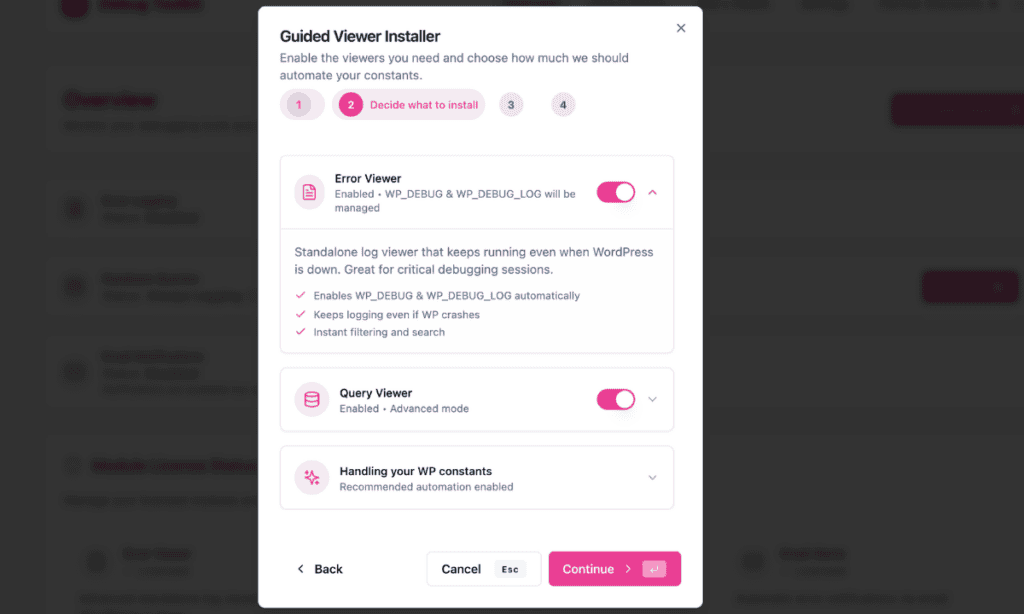
Click Continue.
Set your viewer password here. Because the viewer exposes stack traces, database queries, and file paths, a password is required, with a minimum length of 8 characters. Use Generate a secure password if you want WPDT to create one for you, or type your own and click Show password to confirm it.
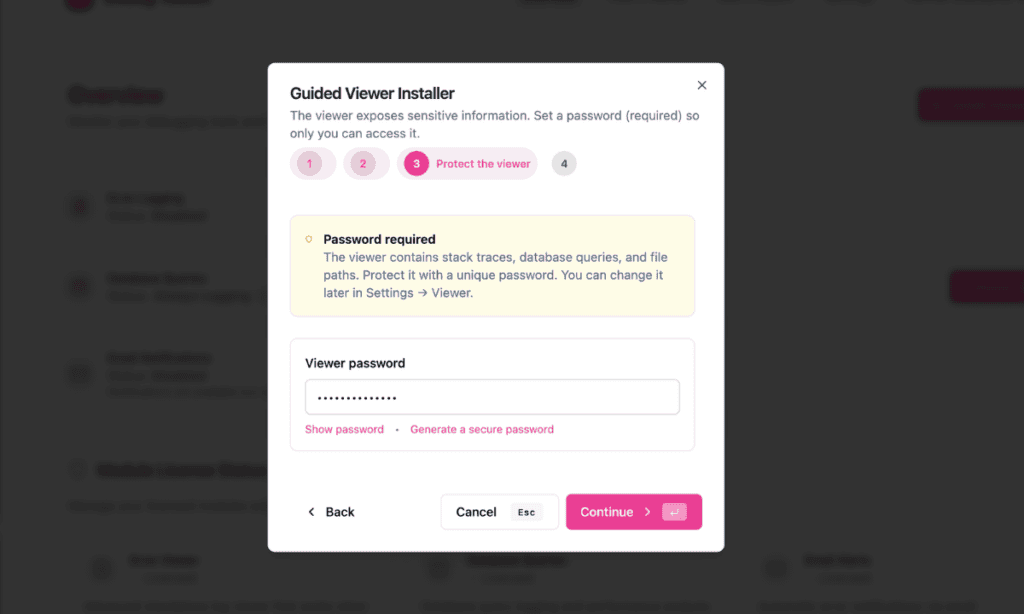
Note: Store this password somewhere you can easily access it. You will need it every time you log in to the viewer, including during a site crash when you cannot access WordPress. Change it anytime at WP Debug Toolkit › Settings › Viewer.
Click Continue.
Before writing anything to disk, the installer shows you a full summary: your viewer URL, which viewers are being installed, which constants WPDT will manage, and confirmation that a password is set. Read through it, then click Install Viewer.
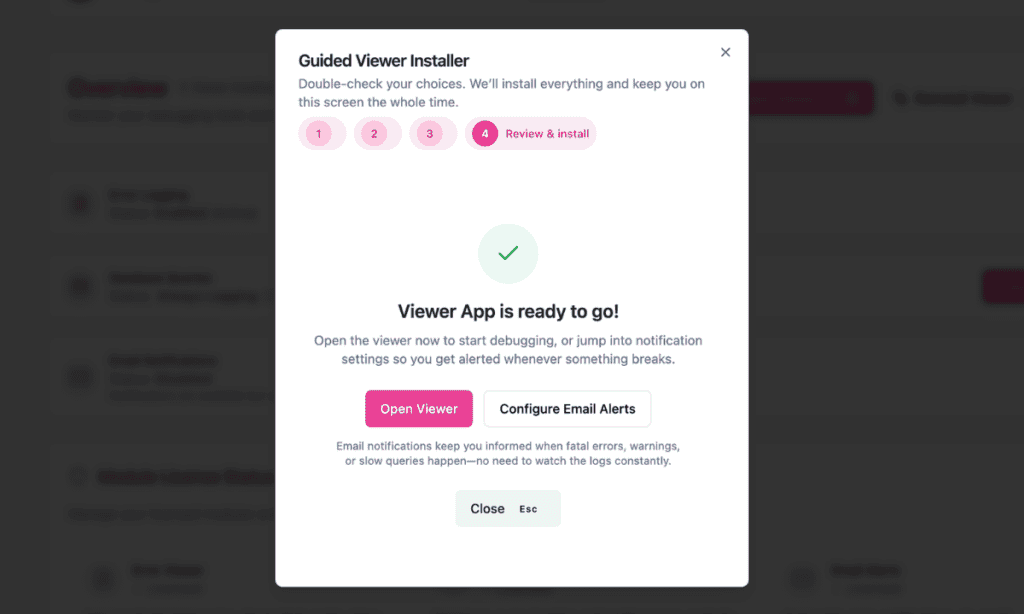
WPDT deploys the files and stays on this screen while the installation runs. When it finishes, your viewer is live at the URL in the summary. You can re-run the installer at any time from the Overview page.
✅ What You Should See
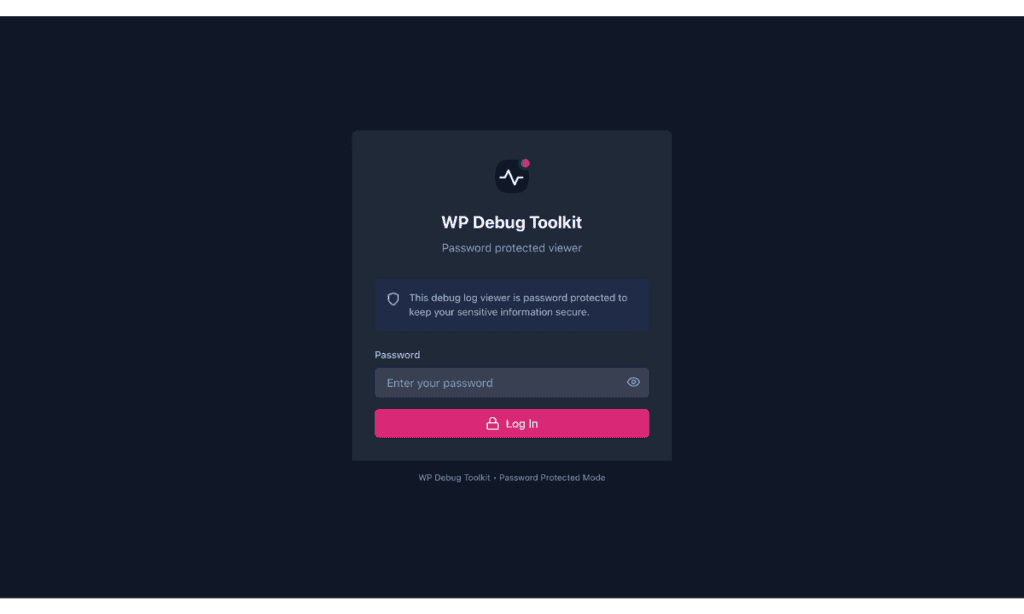
Visit the viewer URL shown in the Step 4 summary. You should see a login screen with a password field. Enter the password you set in Step 3. After logging in, the viewer displays your error log, or an empty state if no WordPress errors have been logged yet. A login screen at your viewer URL confirms the Viewer App is installed and working correctly.
The setup wizard copies these files to your website’s root folder (for example, /var/www/html/wpdebugtoolkit/):
| File | Purpose |
|---|---|
index.php | Loads the React application when you visit the viewer URL. |
| React build files (HTML, CSS, JS) | Renders the viewer interface in your browser. |
api.php | Reads log files and manages viewer settings without involving WordPress. |
config.php | Stores log paths and viewer configuration; generated automatically during setup. |
auth.php | Holds the password hash used to authenticate viewer logins. |
rate-limiter.php | Enforces brute-force login protection using SQLite, independently of WordPress. |
settings-manager.php | Stores viewer settings using SQLite, independently of WordPress. |
None of these files depend on WordPress. They use plain PHP and direct filesystem access.
To install the Viewer App from the command line:
# Install the viewer with a password
# Replace MySecurePass123 with your chosen password
wp dbtk viewer setup --password=MySecurePass123
Example output:
Setting up viewer...
Success: Viewer installed at: https://example.com/wpdebugtoolkit/
To confirm the viewer is installed and check its current configuration:
# Show viewer installation status and URL
wp dbtk viewer status
Example output:
+---------------------+----------------------------------------------+
| Field               | Value                                        |
+---------------------+----------------------------------------------+
| Installed           | Yes                                          |
| URL directory       | wpdebugtoolkit                               |
| Password protection | Enabled                                      |
| Full URL            | https://example.com/wpdebugtoolkit/          |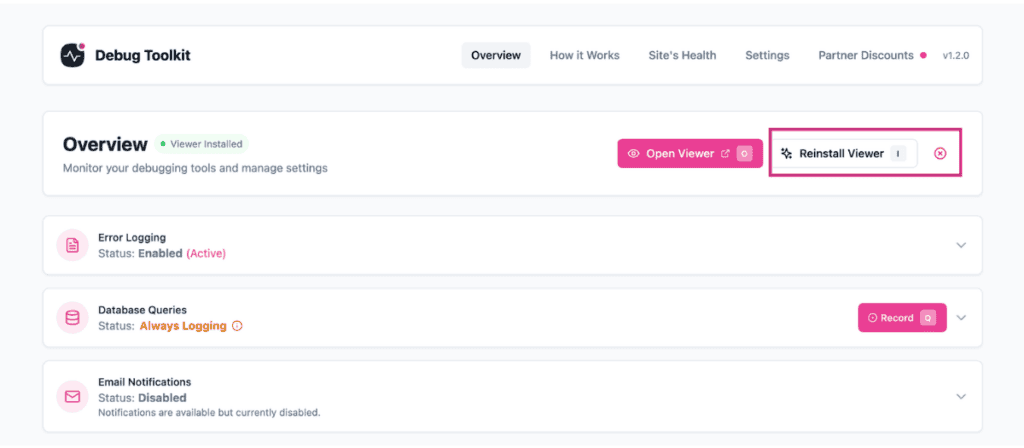
+---------------------+----------------------------------------------+When you update WP Debug Toolkit, the viewer files in your web root may be outdated. To redeploy fresh files, navigate to WP Debug Toolkit › Overview and click Reinstall Viewer. Your password, configuration, and settings are preserved during redeployment, so you do not need to reconfigure anything.
After a server migration or file transfer, you need to check two things.
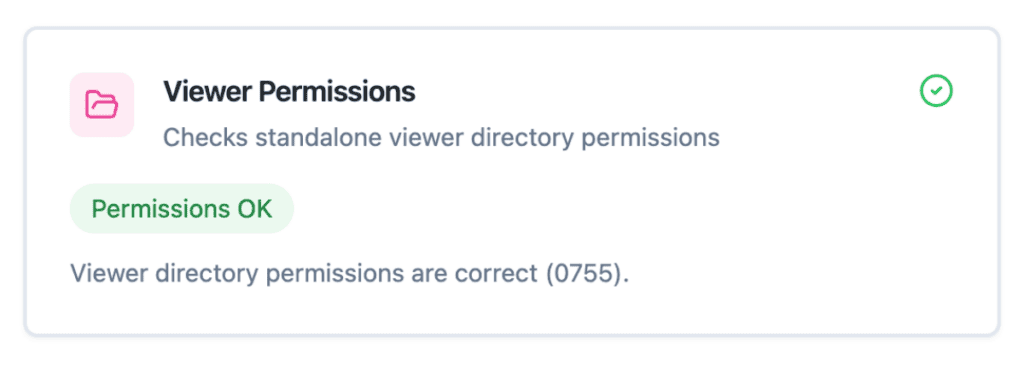
First, head to WP Debug Toolkit › Site’s Health and look at the Viewer Permissions card. If the viewer directory permissions are off, the card flags it and surfaces a Fix Permissions button. You should click it to correct them. No button means permissions are fine.
Second, if files went missing or got corrupted during the transfer, go straight to the Overview page and run Reinstall Viewer to redeploy a clean copy.
If the viewer URL changed after the move, update it under WP Debug Toolkit › Settings › Viewer Settings.
On some hosts, files that WPDT needs to write to during normal operation may be read-only by default. WPDT includes automatic permission elevation that temporarily makes such files writable, applies the change, and restores the original permissions.
This works on most standard hosting environments. For details on how permission elevation works and which hosts it does not support, see Permission Elevation.
Likely cause: The PHP process running WordPress does not have write access to the web root directory, and WPDT’s automatic permission elevation was unable to correct it.
Fix: Check that the web server user (typically www-data, nginx, or apache) has write permission on the web root. You can verify from the command line:
ls -la /path/to/web/root/The web root directory needs 755 permissions and should be owned by, or writable by, the web server user. If you cannot change permissions yourself, contact your hosting provider.
Likely cause: When WordPress is installed in a subdirectory (for example, https://example.com/blog/), the viewer deploys relative to the WordPress installation’s web root. The resulting viewer URL reflects the actual deployment location, which may not match what you expected.
Fix: Check the URL shown in the setup confirmation screen, or run wp dbtk viewer status to see the full URL WPDT assigned to the viewer.
Likely cause: Some hosting environments use non-standard or symlinked web root paths that WPDT’s auto-detection cannot resolve.
Fix: Contact your hosting provider to confirm the absolute web root path. Then add the DBTK_VIEWER_DIR constant to wp-config.php to specify the directory name WPDT should use. See the Advanced Configuration section above for the exact constant syntax.
Likely cause: WPDT’s automatic web root detection uses a series of heuristics that work on most hosts but can misfire on unusual server configurations.
Fix: Contact your hosting provider to confirm the correct web root path, then reach out to WPDT support with those details. Changing the viewer URL slug in the admin UI will not fix this as it controls the folder name only, not where on the server WPDT looks for the web root.
Likely cause: The viewer files are missing from the expected path, a caching layer is serving a stale response, or the server needs additional configuration to route requests to the viewer directory.
Fix: Work through these in order:
.htaccess file. For nginx, you may need to add a try_files directive for the viewer directory. Contact your hosting provider if you are unsure of the correct nginx configuration.No. The Viewer App is a separate installation from the WP Debug Toolkit WordPress plugin. Activating the plugin adds the WPDT modules to wp-admin but does not deploy the viewer files to your web root. You need to run the setup wizard once to install the Viewer App. This is intentional: WPDT lets you choose the URL slug and set a dedicated password before deploying anything to your web root.
Redeployment copies fresh PHP and React files to the viewer directory but leaves auth.php, config.php, and the SQLite database files intact. Your password, log path configuration, and viewer settings are all preserved. You do not need to reconfigure or log in again after a reinstallation.
Yes. The Viewer App is how you read your error logs. Without it installed, WPDT only gives you the settings and controls to manage your debug configuration in wp-admin, but no interface to view the logs themselves. You need to run the setup wizard to get the Viewer App in place before you can start debugging.
Managing the WordPress Error Logs Viewer App – How to update, reinstall, and uninstall the Viewer App after initial setup.
WordPress Error Logs Viewer Authentication and Security – Change your viewer password, configure IP binding, and understand how the rate limiter protects your viewer.
Repairing a Broken Viewer Install – What to do when the viewer stops working after a migration, update, or file transfer.