
WP Debug Toolkit (WPDT) provides controls to install, remove, fix permissions on, and redeploy the WordPress error logs Viewer App from the admin dashboard or WP-CLI. Navigate to Debug Toolkit › Overview to install, reinstall, or remove the viewer. To fix viewer file permissions when the health check flags a problem, navigate to Debug Toolkit › Site’s Health, run the health check, and click Fix Permissions in the Viewer Permissions result. Because the Viewer App installs as a separate directory in your web root, these operations are independent of the WordPress plugin itself.
Navigate to WP Debug Toolkit › Overview. Click Install Viewer.
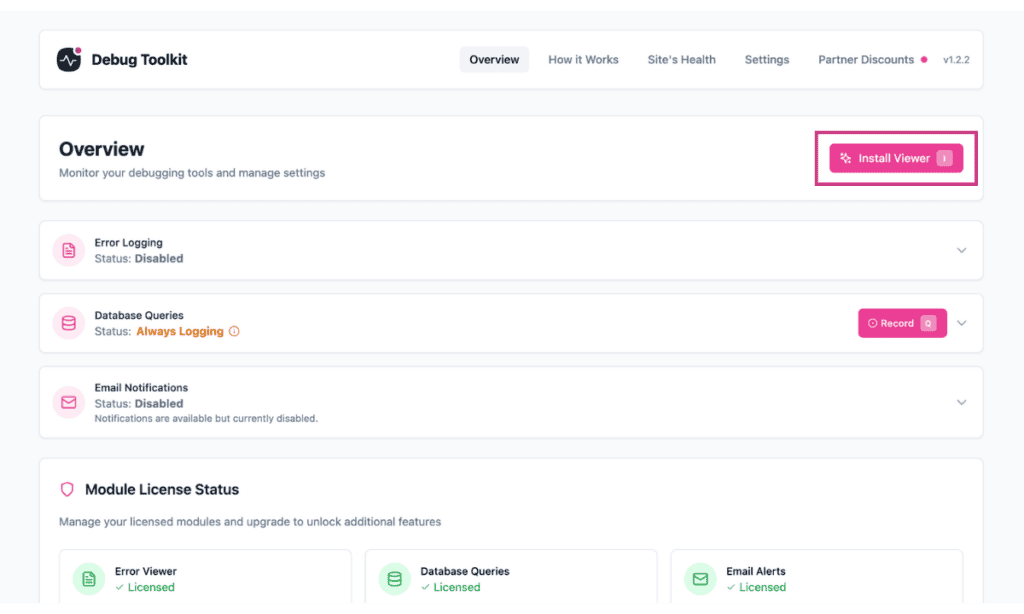
This opens the Guided Viewer Installer, a four-step wizard:
WPDT creates the Viewer directory in your web root, copies the application files into it, writes config.php with the site’s file paths and license state, and writes auth.php with the hashed password. Installation automatically sets directory permissions to 0755, file permissions to 0644, and auth.php to 0600.
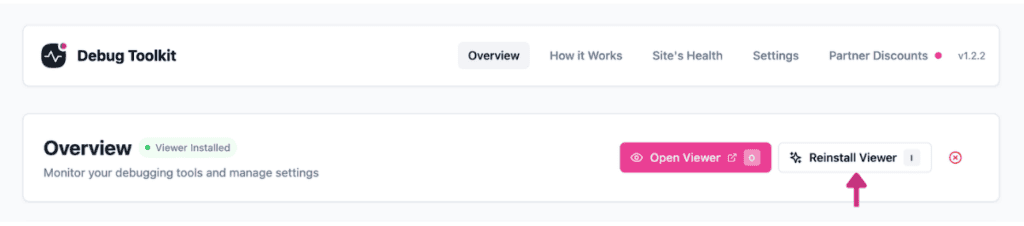
✅ What You Should See: The viewer login prompt loads at yourdomain.com/wpdebugtoolkit/ (or your chosen slug). The Overview page now shows the green Viewer Installed status badge and the Open Viewer, Reinstall Viewer, and Remove Viewer controls in the top-right corner.

WP-CLI alternative:
bash

# Install the Viewer App with password protection

# --password is required; minimum 8 characters

wp dbtk viewer setup --password=YourSecurePasswordNavigate to WP Debug Toolkit › Overview. Hover the Remove Viewer icon button, which sits immediately to the right of Reinstall Viewer, and click it. A confirmation dialog appears before anything is deleted.
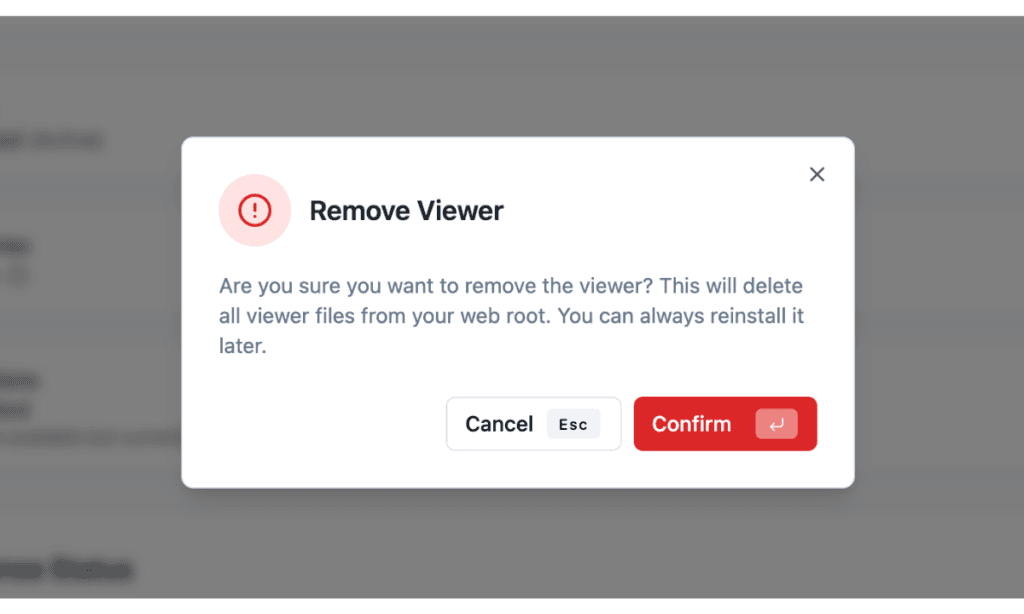
Removing the Viewer App deletes the viewer directory and all its files from your web root. Plugin settings and the saved password hash are preserved in the WordPress database after removal. When you reinstall, the setup wizard requires you to set a password again. You can use the same password that you previously used.
WP-CLI alternative:
bash

# Remove the Viewer App

# Add --yes to skip the confirmation prompt in automated contexts

wp dbtk viewer remove --yes
✅ What You Should See: The viewer URL returns a 404. The Overview page replaces the viewer controls with the Install Viewer button.
This feature is useful after a server migration, hosting change, or manual file transfer to the web root. These operations can reset the viewer directory’s permissions to values the web server cannot read, causing 403 errors or blank responses.
Navigate to WP Debug Toolkit › Site’s Health and click Run Health Check. WPDT runs a Viewer Permissions check as part of the results.
If permissions are incorrect, the check reports a problem and a Fix Permissions button appears directly below the Viewer Permissions result. Click it to reset the viewer directory permissions to 0755.
If your viewer loads correctly and the health check shows the Viewer Permissions result as passing, no action is needed. The Fix Permissions button only appears when WPDT detects an actual permissions problem.
If individual file permissions are also affected, for example, after a full server migration, running Reinstall Viewer from the Overview page is more thorough, as it re-copies all viewer files with correct permissions, 0644 for application files and 0600 for auth.php, set by the copy process itself.
There is no WP-CLI command for this operation.
The viewer files deployed to your web root are independent of the WordPress plugin files. When WPDT updates through the WordPress updater, the deployed api.php, config.php, index.php, React assets, and supporting PHP files in the viewer directory do not update automatically.
The updated plugin package may include bug fixes, new features, or security patches that the currently deployed copy does not have.
Navigate to WP Debug Toolkit › Overview and click Reinstall Viewer. WPDT replaces the deployed files with fresh copies from the updated plugin. Your password and session state are preserved during this operation. The password hash is persisted as a WordPress option and re-written into the viewer’s auth.php on each install, so reinstalling regenerates auth.php from the stored option and does not log you out.
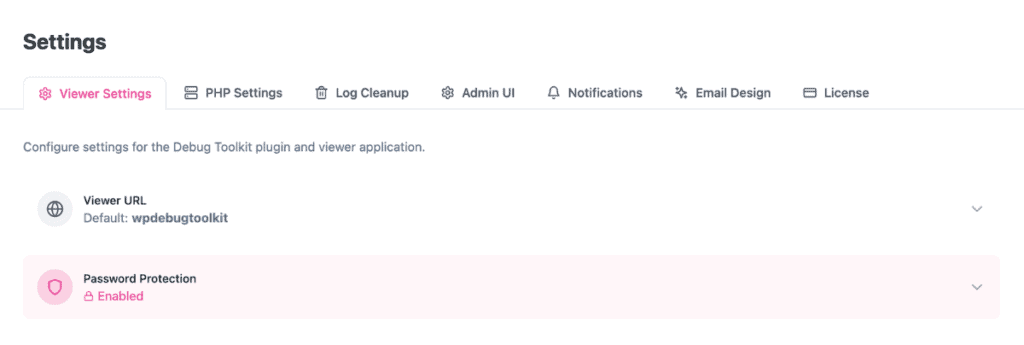
Via the admin dashboard: Navigate to WP Debug Toolkit › Settings › Viewer Settings. The Viewer URL accordion shows the current URL slug and the Password Protection accordion shows whether password protection is enabled. This reflects the stored configuration.
Via WP-CLI: The wp dbtk viewer status command goes further. It verifies whether the viewer files actually exist on disk, not just what the settings say.
bash

# Show the current Viewer App installation status

# Default output format is a table

wp dbtk viewer status

# Use --format=json for machine-readable output

wp dbtk viewer status --format=json
The table output returns up to four fields:
| Field | What It Shows |
|---|---|
| Installed | Whether the viewer directory and index.php physically exist on the server |
| URL directory | The current URL slug, for example wpdebugtoolkit |
| Password protection | Whether password protection is enabled or disabled |
| Full URL | The complete viewer URL, which is shown only when the viewer is installed |
Use the CLI command when you need to confirm the viewer is actually present on disk, for example, after a migration or a failed reinstall where the settings may still look correct, but the files are gone.
Likely cause: The server migration reset the viewer directory’s permissions.
Fix: Navigate to WP Debug Toolkit › Site’s Health and click Run Health Check. If the Viewer Permissions result flags a problem, click Fix Permissions to reset the directory to 0755. If file permissions are also affected, click Reinstall Viewer from the Overview page to re-copy all files with correct permissions.
Likely cause: The viewer directory was not created, the URL slug does not match the directory on disk, or a caching layer is serving a stale 404 response.
Fix: Run wp dbtk viewer status to confirm the URL slug. Verify the directory exists on the server at the expected path. Clear any caching plugin or CDN cache, then test again.
Likely cause: The deployed viewer files in your web root are from an earlier version of WPDT.
Fix: Navigate to WP Debug Toolkit › Overview and click Reinstall Viewer to copy fresh files from the updated plugin.
No. The error log file (debug.log) is stored separately from the Viewer App directory. Removing the viewer deletes only the viewer application files. The logs the viewer reads are unaffected.
Yes. Updating the WordPress plugin does not automatically redeploy the viewer files in your web root. After each WPDT update, navigate to WP Debug Toolkit › Overview and click Reinstall Viewer to keep the deployed files in sync with the updated plugin.
Yes, and you can do this without removing and reinstalling it. Navigate to WP Debug Toolkit › Settings › Viewer Settings and expand the Viewer URL accordion. Enter your new URL slug in the text field and click Update URL. WPDT renames the viewer directory on disk to match the new slug. See Custom Viewer URL for the full URL change workflow.
Setting Up the Viewer App – Haven’t installed the Viewer App yet? Start here before any of the operations above will work.
Custom Viewer URL – Change your viewer’s directory slug from the Viewer Settings tab without removing and reinstalling.
Site Health Integration – Learn what the Viewer Permissions check actually tests, and what a failing result means for your install.