
Set up WP Debug Toolkit (WPDT) email notifications at WP Debug Toolkit › Settings › Notifications. Enable the Email Notifications toggle, enter a recipient address, select the PHP error levels that trigger alerts, configure rate limiting to prevent inbox flooding, and install the MU-plugin, which registers the error handler and makes notifications work. The entire process takes under five minutes and requires no FTP access.
This guide assumes you have installed and activated WP Debug Toolkit on your site. If you haven’t done that yet, start with Installing WP Debug Toolkit and Activating and Deactivating Your License before continuing here.
The steps below cover the notification configuration only. They don’t explain how the MU-plugin, memory protection, and rate limiting work under the hood. If you want that context before you configure anything, read Email Notifications Overview first.
Navigate to WP Debug Toolkit › Settings › Notifications. The Notifications tab opens to an Email Settings section containing four collapsible items: Email Notifications, Email Address, Error Levels, and Rate Limiting. A Send Test Email button and a Save Settings button appear at the bottom of this section.
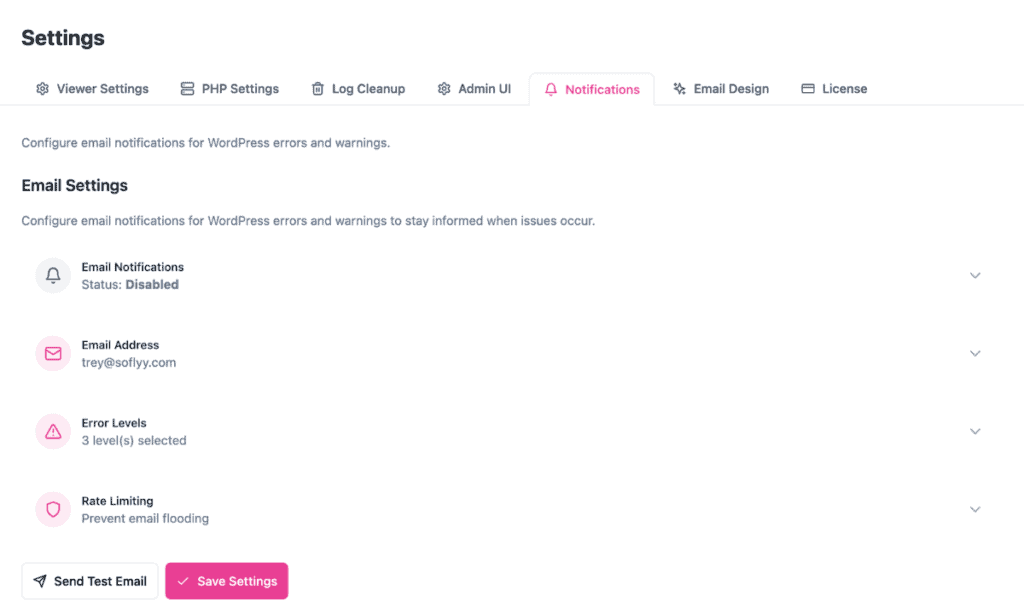
Expand the Email Notifications accordion item. The current status reads Disabled by default. Click Enable Email Notifications to activate the alert system.
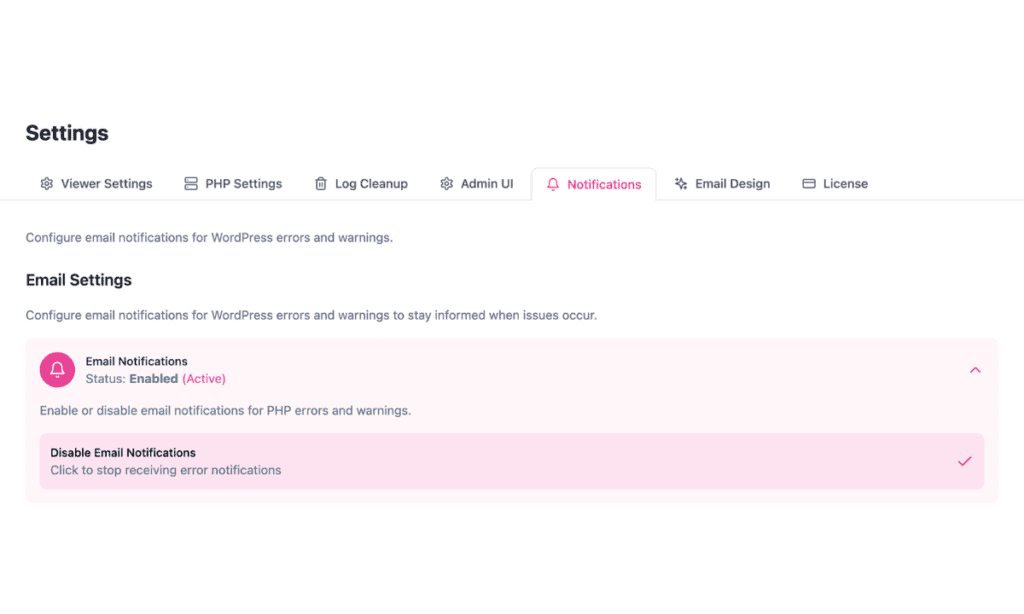
✅ What You Should See: The status indicator inside the Email Notifications item updates to reflect an enabled state.
Expand the Email Address accordion item and enter the address where WPDT should send error alerts. The field defaults to your WordPress admin email address. A shared team inbox or a dedicated monitoring address works well for agency environments where multiple people need visibility into site errors.
Expand the Error Levels accordion item and choose which PHP error types trigger a notification.
WPDT enables three error levels by default: E_ERROR, E_PARSE, and E_USER_ERROR. These cover fatal and site-breaking errors and are an appropriate selection for most production environments.

Enabling E_NOTICE and E_DEPRECATED on a production site generates high notification volume from routine WordPress and plugin code, so reserve those levels for active debugging sessions on staging environments.
Click Save Settings before moving to the next step.
Expand the Rate Limiting accordion item. Two controls manage how frequently WPDT sends alert emails.
Per-Error Cooldown sets the minimum time between emails for the same error signature. The default is 1 hour, with presets at 15min, 30min, 1hr, 6hr, 12hr, and 24hr. You can also enter any value between 60 seconds and 24 hours directly in the field.
Max Emails Per Hour caps the total number of notification emails WPDT sends across all errors within a one-hour window. The default is 10, with presets at 5, 10, 20, 50, and 100.
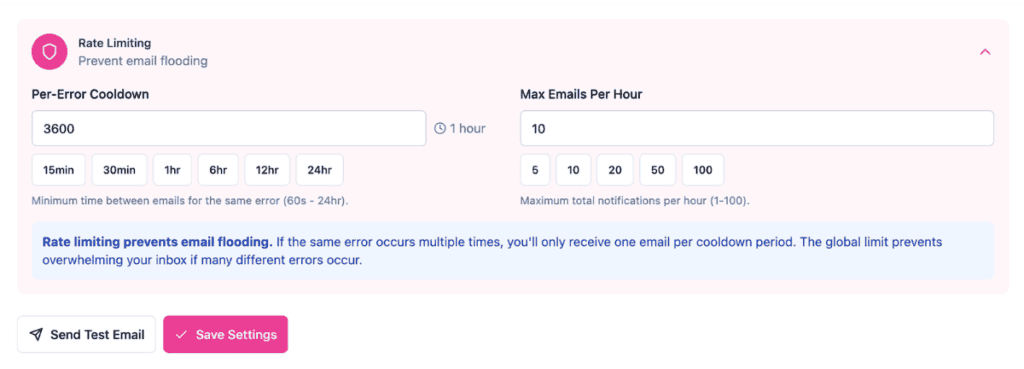
Suppressed alerts are still recorded in the alert history log, so you do not lose visibility when either limit kicks in.
For a stable production site, the defaults keep your inbox manageable. During active debugging or immediately after a deployment, shorten the cooldown to receive faster updates on recurring errors.
Click Save Settings.
Scroll down to the Must-Use Plugin section, located below Email Settings on the same Notifications tab.
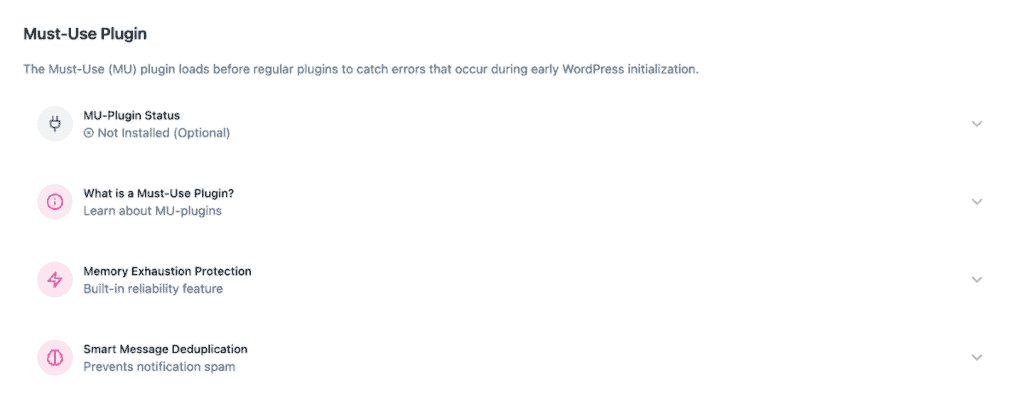
The status shows Not installed (Optional). The “(Optional)” label means WPDT will not install this automatically; it does not mean notifications function without it.
The MU-plugin is the notification engine. It is the only part of WPDT that automatically captures qualifying PHP errors and dispatches alert emails for them, and it is the only part that writes entries to the notification history log.
The settings you configured in Steps 2 through 5 have no effect until the MU-plugin is installed and running. Installing it as an MU-plugin specifically means WordPress loads it before any regular plugins, which also allows it to capture fatal errors that crash the site during initialization, including memory-exhaustion errors, since the MU-plugin reserves 256KB of memory at startup specifically to survive them.
Before the Install MU-Plugin button, WPDT displays three directory status checks:
All three checks must show a passing status before you proceed. If any check fails, resolve the directory permission issue first. Afterward, click Install MU-Plugin and WPDT immediately copies three files to your server:
email-helpers.php installs to wp-content/mu-plugins/ — shared email helper functions required by the MU-pluginNote: There is no WP-CLI command to install the MU-plugin in the current plugin version. Installation requires using the Install MU-Plugin button in the UI.
Click Send Test Email. WPDT dispatches a test message to the address configured in the Email Address field. Check your inbox and your spam folder. If the message does not arrive within two minutes, see the troubleshooting section below.
Note: the test email confirms that your mail delivery is working, but it does not use the MU-plugin. As such, it will not appear in your notification history, and a successful test does not confirm that the MU-plugin is capturing real errors. To verify the MU-plugin itself, trigger an actual error after installing it, and confirm an entry appears in the history log.
✅ What You Should See: A success notice appears confirming the test email was dispatched. The test message arrives at your recipient address with the site name in the subject line and basic error details in the body, confirming that wp_mail() is functioning and your host’s mail stack is passing messages through.
| Setting | What It Does |
|---|---|
| Email Notifications | Enables or disables the entire alert system. No alerts fire while this is disabled, regardless of the other settings. Toggle this off temporarily on a known-broken site to silence alerts while you work on a fix. |
| Email Address | The address WPDT sends all error notification emails to. Defaults to the WordPress admin email and accepts only a single address. Point this at a team inbox or monitoring service on agency-managed sites so alerts reach whoever is on call. |
| Error Levels | Controls which PHP error types trigger a notification. The default selection (E_ERROR, E_PARSE, E_USER_ERROR) covers fatal errors on production. Narrowing to these three types prevents alert fatigue from notices and deprecation warnings. |
| Rate Limiting | Controls two independent limits: the per-error cooldown (minimum time between repeat alerts for the same error, default 1 hour) and the max emails per hour (total notification cap across all errors, default 10). Suppressed alerts are still recorded in the alert history log. Tighten both settings during active debugging; loosen them on a stable production site to reduce inbox noise. |
Likely cause: Your hosting environment’s mail stack is blocking or not routing wp_mail() messages.
Fix: Confirm your host supports outgoing mail from PHP. Many managed hosts disable or restrict native PHP mail so you may have to install and configure an SMTP plugin (such as WP Mail SMTP) to route notifications through a transactional mail service. Also check your spam or junk folder as some mail clients filter automated WordPress messages by default. After adding SMTP routing, click Send Test Email again to confirm delivery.
Likely cause: The wp-content/mu-plugins directory either does not exist or is not writable by the web server.
Fix: Check the Directory Status indicators above the Install MU-Plugin button. The UI identifies which check is failing. If the mu-plugins directory does not exist, create it manually via your host’s file manager or over SFTP, then reload the page. If the directory exists but is not writable, correct the permissions so the web server user has write access. Once the failing check clears, the button becomes active and installation can proceed.
Yes. The MU-plugin is what actually captures PHP errors and sends the alert emails, so no automatic notifications go out until it’s installed. This includes fatal and memory-exhaustion errors that crash WordPress before regular plugins load (the MU-plugin loads first and reserves 256KB of memory at startup specifically to survive those errors). You can still use Send Test Email without it installed, since that only checks whether your mail delivery is working, but it will never alert you to a real error. Installing the MU-plugin takes seconds and requires no FTP access, so install it on every site where you want notifications to actually work.
The Email Address field accepts a single address only. WPDT validates the entry using WordPress’s is_email() function, which does not accept comma-separated lists. To reach multiple people, point the field at a shared team inbox or a group alias that distributes to multiple recipients on the mail server side.
WPDT separates the notification system into three distinct files to keep each component focused. The main MU-plugin file (wpdebugtoolkit-notifications.php) handles the shutdown handler and error capture logic. The helper file (email-helpers.php) contains shared email-building functions. The drop-in (fatal-error-handler.php), placed in wp-content/, hooks into WordPress’s early fatal error interception layer, which is the same mechanism WordPress core uses for its own recovery mode. Splitting the files means WPDT can update any one component without touching the others.
Email Notifications Overview – Understand what’s actually happening under the hood; how the MU-plugin, memory protection, and rate limiting work together before you configure them.
Rate Limiting and Alert History – See how WPDT decides when to send an alert, when to suppress one, and where to find the alerts it held back.
Email Template Customization – Once delivery is working, here’s how to brand your notification emails with your logo, colors, and contact details.